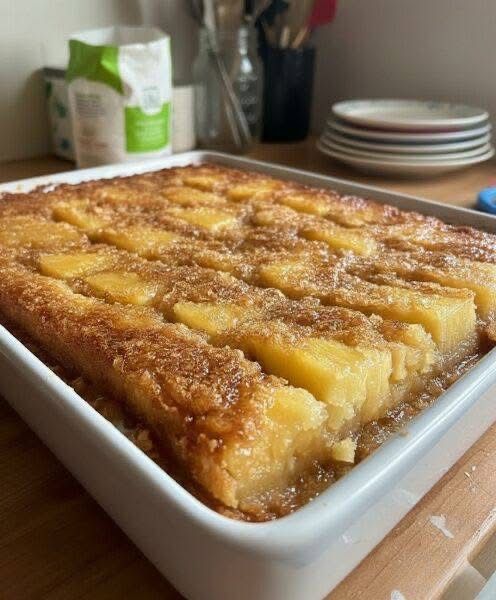
ALL RECIPES

Strawberry Dream Sheet Cake

The Ultimate Strawberry Dream Sheet Cake

Introduction

Behold the Strawberry Dream Sheet Cake, a dessert that is as delightful to the palate as it is to the eye. The image showcases a masterpiece of textures and flavors: a soft, tender cake base, a luxuriously creamy and cool filling, all crowned with a generous mountain of fresh, glazed strawberries. This dessert is the embodiment of summer, but its timeless appeal makes it a favorite year-round. It strikes the perfect balance between sweet, tangy, and creamy, ensuring that every bite is a moment of pure bliss. This recipe will guide you through creating this showstopper from scratch, guaranteeing rave reviews from friends and family.

A Slice of History

While the exact origin of this specific layered dessert is hard to pinpoint, its components have a rich history. Sheet cakes became popular in the United States in the mid-20th century as a practical way to serve a large number of people easily. They were the go-to for church suppers, community picnics, and family reunions. The concept of a creamy, no-bake layer topped with fruit has roots in desserts like the “icebox cake” and the famous “strawberry pretzel salad,” which also features a layered combination of salty/sweet, creamy, and fruity. This Strawberry Dream Sheet Cake is a modern evolution, combining the best of a traditional baked cake with the fresh, vibrant topping of a fruit dessert.

The Allure for Lovers of Dessert

This cake is for the lovers of contrast.

  • For the lovers of texture: You get the soft crumb of the cake, the smooth velvet of the cream cheese filling, and the juicy burst of the fresh strawberries.
  • For the lovers of fresh fruit: Unlike many baked fruit desserts where the fruit is cooked down, this recipe celebrates the bright, vibrant flavor of fresh strawberries, making them the star of the show.
  • For the lovers of balance: This isn’t a cloyingly sweet dessert. The tang from the cream cheese and the natural tartness of the strawberries cut through the richness, creating a perfectly balanced and refreshing treat.

The Recipe

This recipe is broken down into three main parts: the cake base, the creamy filling, and the strawberry topping.

Ingredients

For the White Cake Base:

  • 221​ cups all-purpose flour
  • 121​ cups granulated sugar
  • 1 tablespoon baking powder
  • 21​ teaspoon salt
  • 21​ cup unsalted butter, softened to room temperature
  • 4 large egg whites, at room temperature
  • 1 cup whole milk, at room temperature
  • 1 tablespoon vanilla extract

For the Cream Cheese Filling:

  • 16 ounces (2 blocks) cream cheese, softened
  • 1 cup powdered sugar
  • 1 teaspoon vanilla extract
  • 121​ cups heavy whipping cream, cold

For the Fresh Strawberry Topping:

  • 2 pounds (about 8 cups) fresh strawberries, hulled and sliced or quartered
  • 43​ cup granulated sugar (adjust based on strawberry sweetness)
  • 41​ cup water
  • 3 tablespoons cornstarch
  • 1 tablespoon fresh lemon juice

Instructions (The Method)

Here is the step-by-step method for creating your masterpiece.

Method 1: Preparing the Cake Base

  1. Preheat and Prep: Preheat your oven to 350°F (175°C). Grease and flour a 9×13 inch baking pan (sheet pan).
  2. Combine Dry Ingredients: In a large mixing bowl, whisk together the flour, granulated sugar, baking powder, and salt.
  3. Add Butter: Add the softened butter to the dry ingredients. Using a mixer on low speed, beat until the mixture resembles coarse crumbs.
  4. Combine Wet Ingredients: In a separate bowl or measuring cup, whisk together the egg whites, milk, and vanilla extract.
  5. Mix the Batter: Pour half of the wet ingredients into the dry mixture and beat on medium speed for about 1 minute until smooth. Scrape down the sides of the bowl. Add the remaining wet ingredients and beat for another 30 seconds until fully combined. Do not overmix.
  6. Bake: Pour the batter into the prepared pan and spread evenly. Bake for 30-35 minutes, or until a toothpick inserted into the center comes out clean.
  7. Cool Completely: Let the cake cool in the pan for 15 minutes before transferring it to a wire rack to cool completely. It is crucial that the cake is 100% cool before you add the filling.

Method 2: Making the Creamy Filling

  1. Beat Cream Cheese: In a large bowl, use a hand mixer or stand mixer to beat the softened cream cheese until it is completely smooth and free of lumps.
  2. Add Sugar and Vanilla: Add the powdered sugar and vanilla extract, and beat on low speed until combined, then increase to medium speed and beat until smooth.
  3. Whip Cream: In a separate, chilled bowl, whip the cold heavy cream until stiff peaks form.
  4. Combine: Gently fold the whipped cream into the cream cheese mixture in two or three additions until it’s uniform and smooth. Be careful not to deflate the whipped cream.

Method 3: Creating the Strawberry Topping & Final Assembly

  1. Prep Strawberries: Gently wash, hull, and slice your strawberries. Set aside about 3/4 of the most beautiful slices in a large bowl.
  2. Make the Glaze: Take the remaining 1/4 of the strawberries (the less perfect ones are fine) and mash them in a small saucepan. Add the sugar, water, and cornstarch.
  3. Cook the Glaze: Whisk everything together and bring to a simmer over medium heat, stirring constantly. Let it bubble gently for about 2 minutes until the sauce has thickened and turned a glossy, translucent red.
  4. Finish the Glaze: Remove from the heat and stir in the lemon juice. Allow the glaze to cool for at least 15-20 minutes. It should be lukewarm, not hot.
  5. Combine: Pour the slightly cooled glaze over the fresh, sliced strawberries you set aside earlier. Gently toss to coat every piece.

Formation: The Art of Layering

This is where the magic comes together. The structure is key to its success.

  1. The Foundation: Start with your completely cooled 9×13 inch cake.
  2. The Creamy Heart: Spread the cream cheese filling evenly over the top of the cooled cake, all the way to the edges.
  3. Chill: Place the cake with the cream layer in the refrigerator for at least 30 minutes to an hour. This step is vital! It allows the filling to set and firm up, preventing it from melting when you add the strawberry topping.
  4. The Crown Jewel: Once the filling is firm, carefully spoon the glazed strawberry mixture over the top. Spread it out gently to cover the entire surface.
  5. Final Chill: Refrigerate the finished cake for at least 4 hours, but preferably overnight. This allows the flavors to meld together and the cake to set perfectly, making it easier to slice and serve.

Healthful Benefits of Strawberries

While this is an indulgent dessert, its star ingredient, strawberries, are nutritional powerhouses. They are packed with:

  • Vitamin C: A single serving of strawberries can provide more than a day’s worth of Vitamin C, which is essential for a healthy immune system and skin health.
  • Antioxidants: Strawberries are rich in antioxidants like anthocyanins (which give them their red color), which help fight oxidative stress in the body.
  • Manganese: This mineral is important for bone health and metabolism.
  • Fiber: They are a good source of dietary fiber, which aids in digestion.

Nutritional Information

This is an approximation per serving, assuming the cake is cut into 12 slices. Actual values may vary.

  • Calories: 400-500 kcal
  • Fat: 20-25 g
  • Carbohydrates: 45-55 g
  • Sugars: 30-40 g
  • Protein: 5-7 g
  • Vitamin C: A significant portion of your daily value.

Conclusion

The Strawberry Dream Sheet Cake is more than just a recipe; it’s an experience. It’s the perfect centerpiece for a special occasion and a guaranteed way to bring smiles to the faces of your loved ones. The combination of a simple cake, a rich and tangy cream filling, and a bright, fresh fruit topping creates a dessert that is both sophisticated and comforting. Don’t be intimidated by the steps; each one is simple, and the final result is a testament to the idea that sometimes, the most wonderful things in life are made of simple, beautiful layers.

A Final Word for the Lovers

For the lovers of baking, this recipe offers a satisfying project with a spectacular payoff. For the lovers of eating, it offers a symphony of flavors and textures that dance on the tongue. And for the lovers of sharing, it is the perfect gift to bring to the table—a sweet, edible expression of joy and celebration. Enjoy every single bite.

Related Articles

Leave a Reply

Your email address will not be published. Required fields are marked *

Check Also
Close
Back to top button